This template will get you set up using ROS2 with VSCode as your IDE.
See how I develop with vscode and ros2 for a more in-depth look on how to use this workspace.
ROS2-approved formatters are included in the IDE.
- c++ uncrustify; config from
ament_uncrustify - python autopep8; vscode settings consistent with the style guide
There are many pre-defined tasks, see .vscode/tasks.json for a complete listing. Feel free to adjust them to suit your needs.
Take a look at how I develop using tasks for an idea on how I use tasks in my development.
This template sets up debugging for python files, gdb for cpp programs and ROS launch files. See .vscode/launch.json for configuration details.
The template also comes with basic continuous integration set up. See .github/workflows/ros.yaml.
To remove a linter just delete it's name from this line:
      matrix:
linter: [cppcheck, cpplint, uncrustify, lint_cmake, xmllint, flake8, pep257]You should already have Docker and VSCode with the remote containers plugin installed on your system.
To make nvidia driver and opengl available in docker, follow the installation instructions for docker-nvidia. They include the steps in docker and add the additional gpu layer.
- docker-nvidia (includes docker install and additional installation for NVidia GPU accelerated hosts)
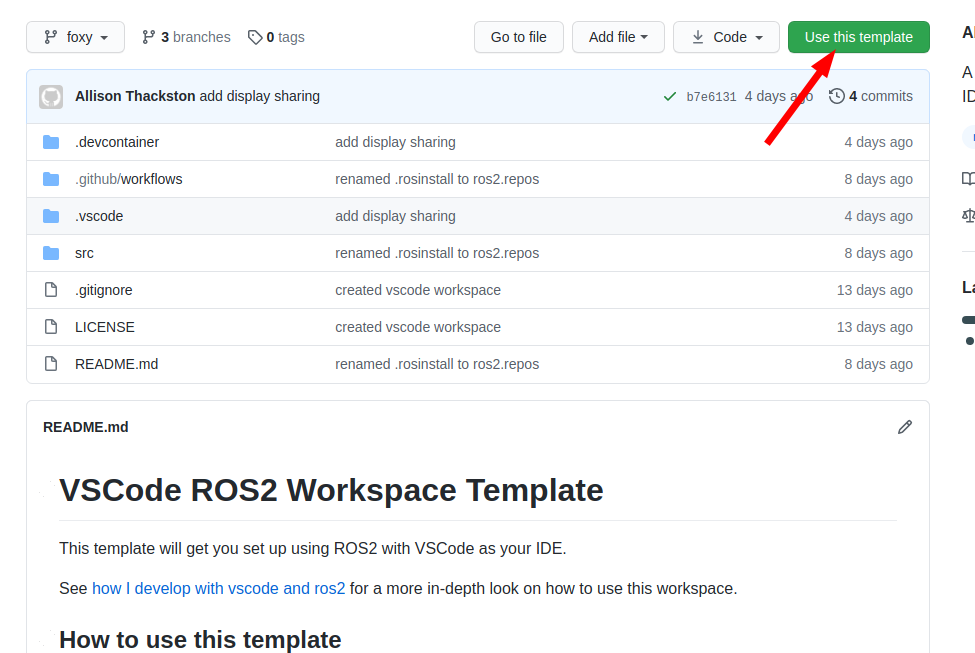
Click on "use this template"
On the next dialog, name the repository you would like to start and decide if you want all of the branches, or the default branch.
Important
The new default branch supports any version of ROS by setting the appropriate version you want in the 'FROM' line in .devcontainer/Dockerfile
By default, this is set to osrf/ros:jazzy-desktop-full
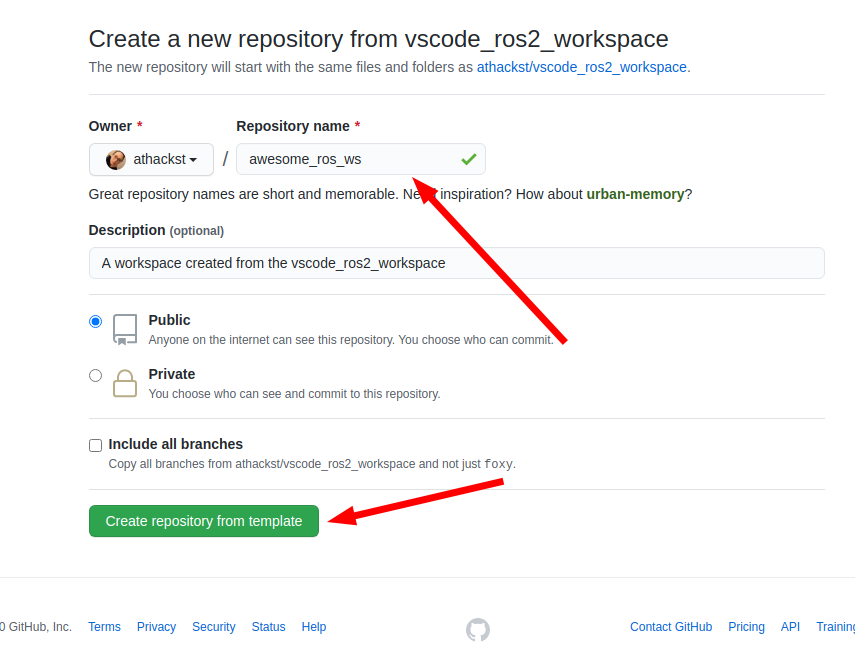
Github will then create a new repository with the contents of this one in your account. It grabs the latest changes as "initial commit".
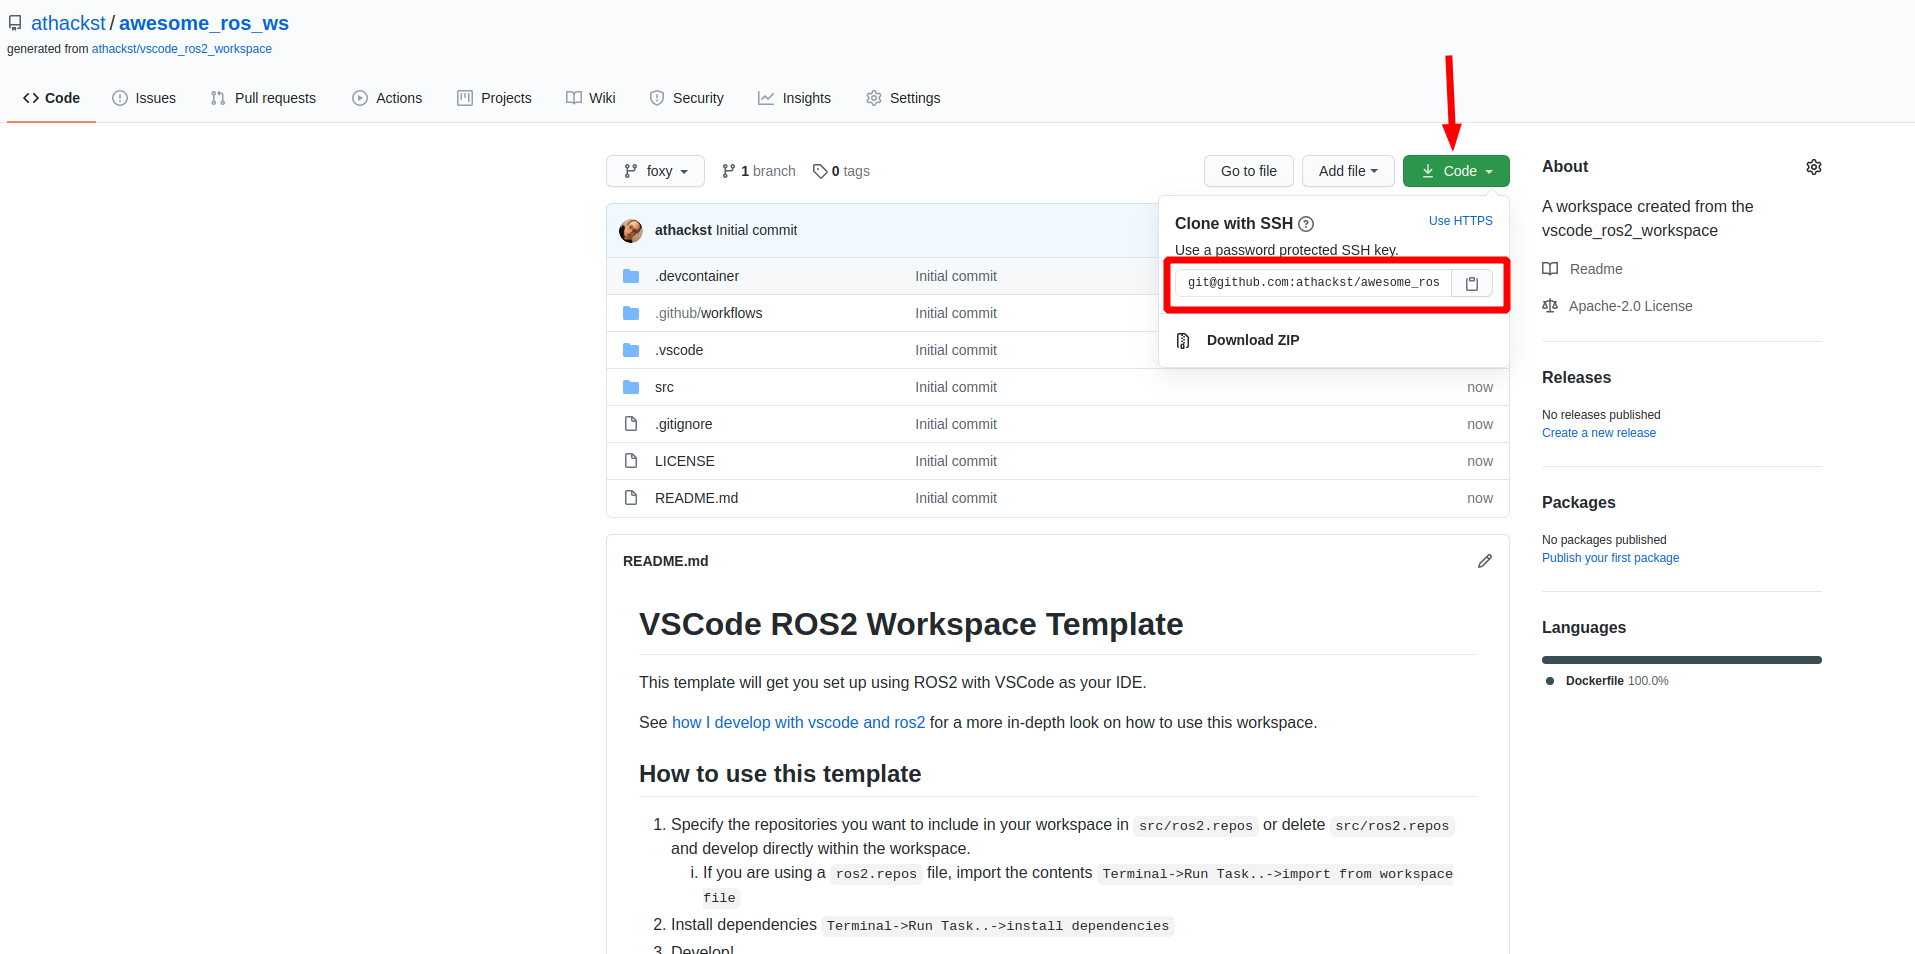
Now you can clone your repo as normal
Now that you've cloned your repo onto your computer, you can open it in VSCode (File->Open Folder).
When you open it for the first time, you should see a little popup that asks you if you would like to open it in a container. Say yes!
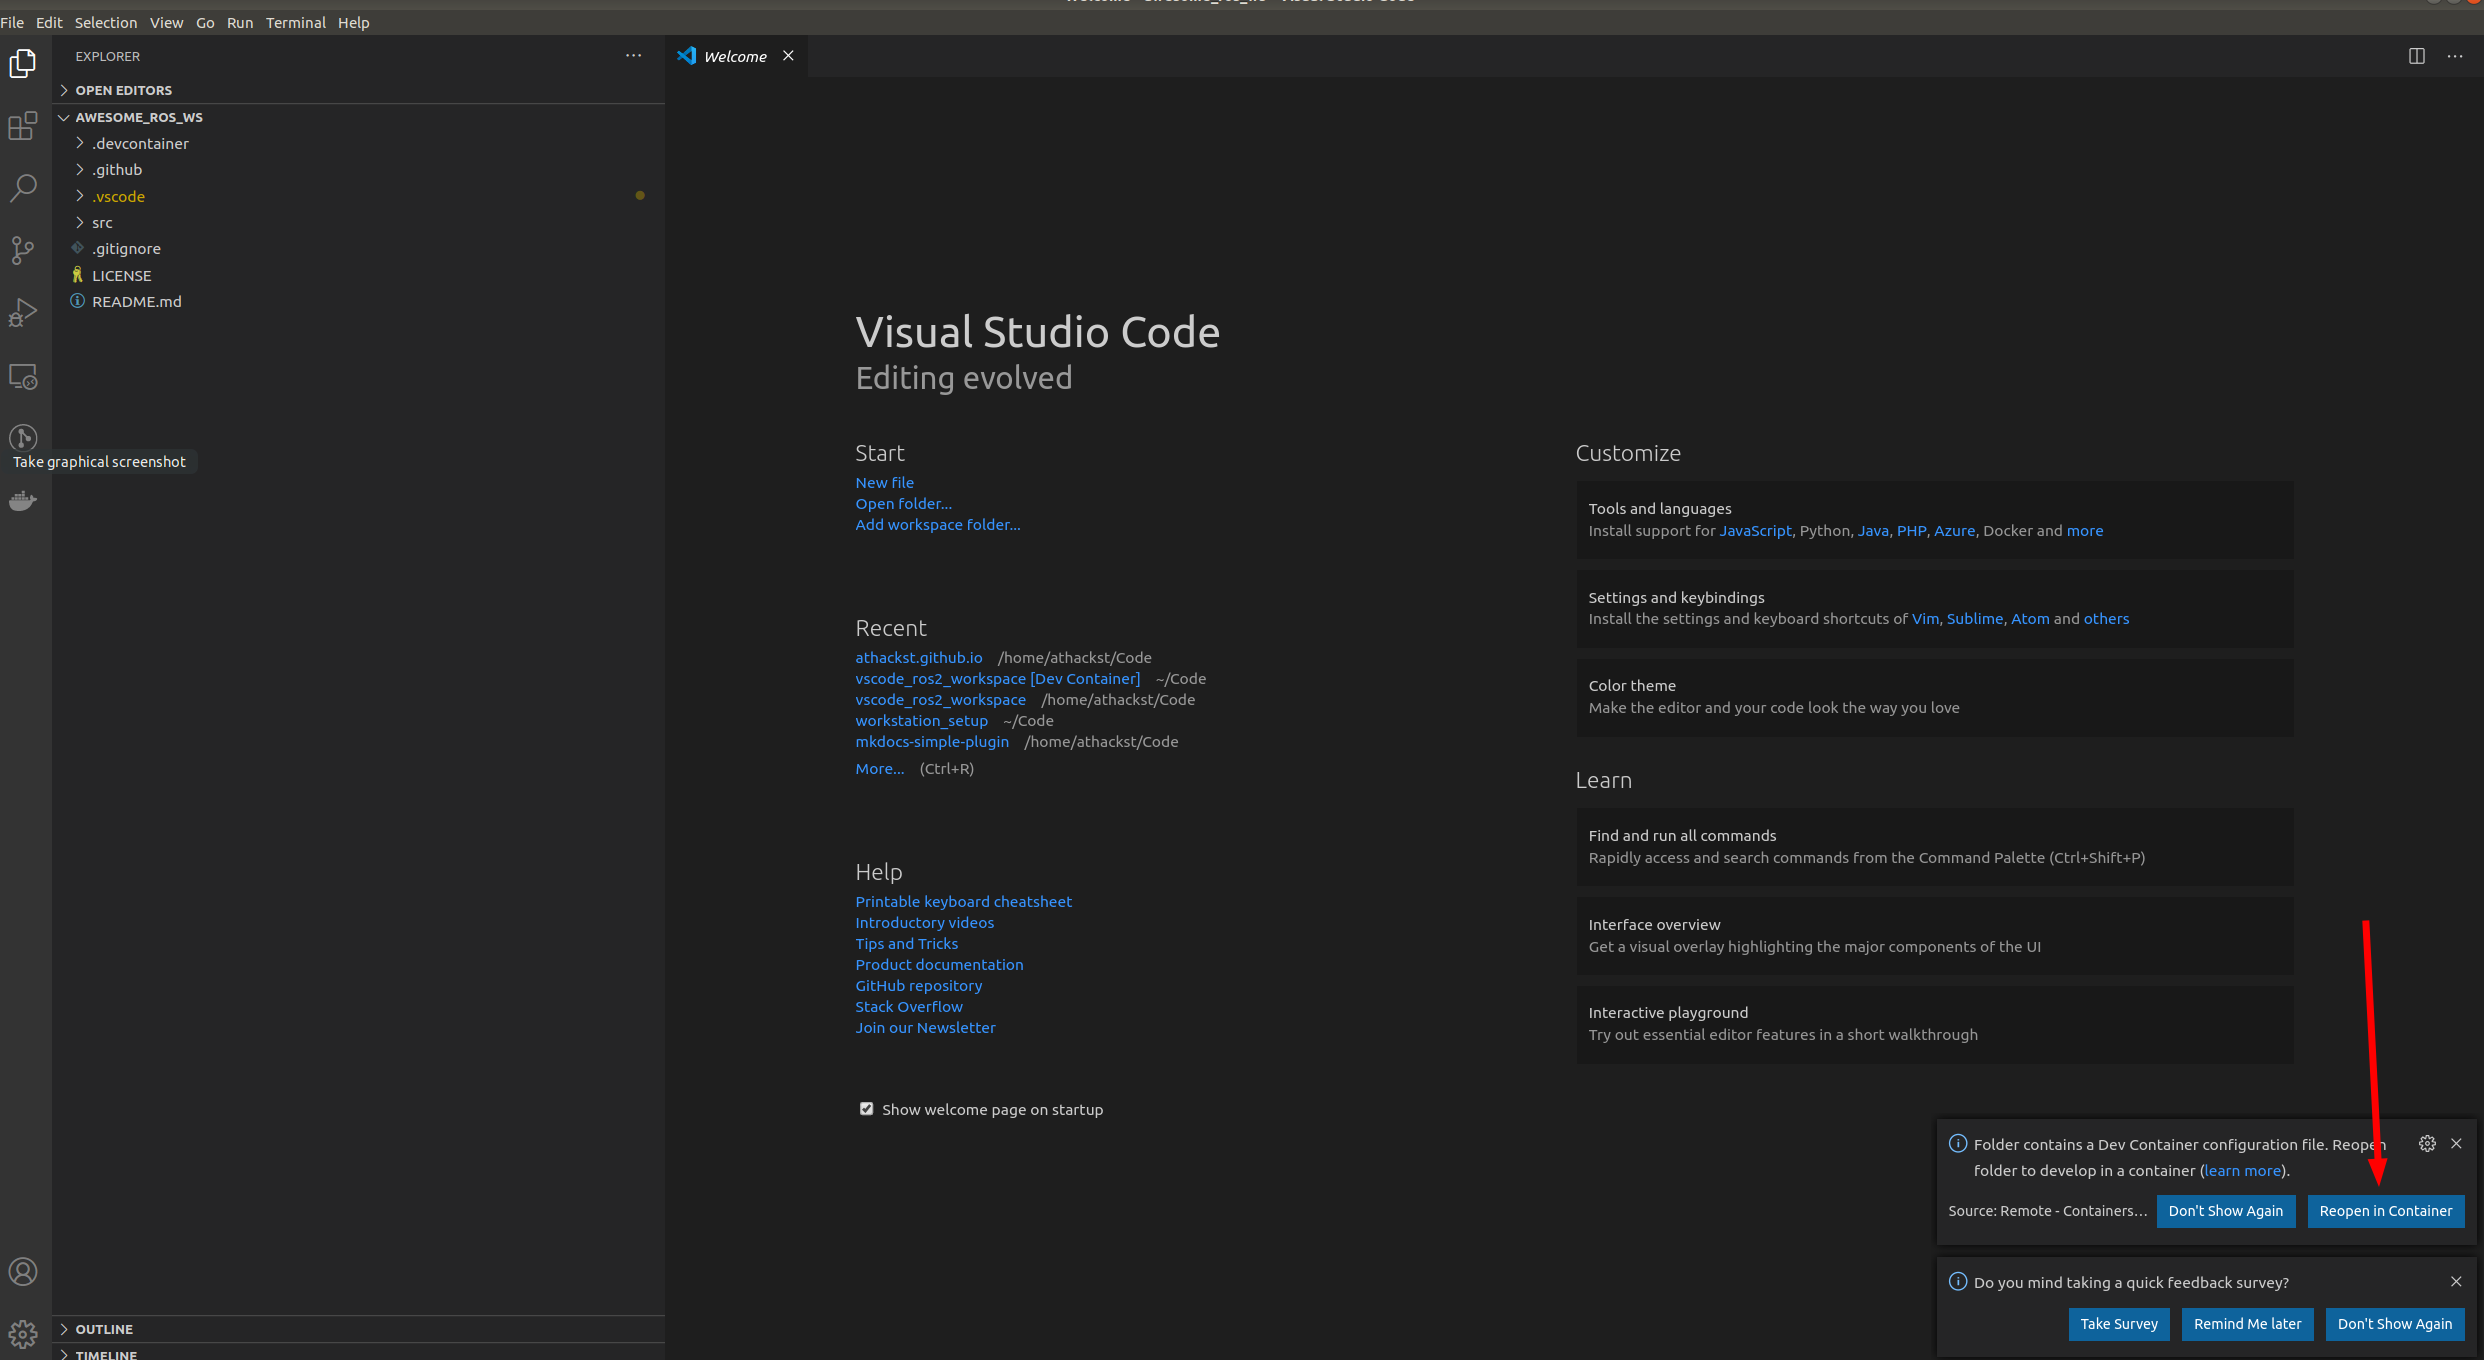
If you don't see the pop-up, click on the little green square in the bottom left corner, which should bring up the container dialog

In the dialog, select "Remote Containers: Reopen in container"
VSCode will build the dockerfile inside of .devcontainer for you. If you open a terminal inside VSCode (Terminal->New Terminal), you should see that your username has been changed to ros, and the bottom left green corner should say "Dev Container"
- Specify the repositories you want to include in your workspace in
src/ros2.reposor deletesrc/ros2.reposand develop directly within the workspace. - If you are using a
ros2.reposfile, import the contentsTerminal->Run Task..->import from workspace file - Install dependencies
Terminal->Run Task..->install dependencies - (optional) Adjust scripts to your liking. These scripts are used both within tasks and CI.
setup.shThe setup commands for your code. Default to import workspace and install dependencies.build.shThe build commands for your code. Default to--merge-installand--symlink-installtest.shThe test commands for your code.
- Develop!
If you see the error:
Authorization required, but no authorization protocol specified Unable to open display: :0 Authorization required, but no authorization protocol specified
You may need to update the UID/GID to match yours. In .devcontainer/devcontainer.json update the lines that are marked Change to match your UID and Change to match your GID
.devcontainer/devcontainer.json
If you see the error:
Couldn't open X display in GLXGLSupport::getGLDisplay at ./.obj-x86_64-linux-gnu/ogre_vendor-prefix/src/ogre_vendor/RenderSystems/GLSupport/src/GLX/OgreGLXGLSupport.cpp
You need to remove or comment out the wayland options
 "runArgs": [
  ...
  // Wayland host
  //"--volume=/mnt/wslg:/mnt/wslg",
  // "--volume=/run/user/1000:/run/user/1000",
  // uncomment to use intel iGPU
  // "--device=/dev/dri"
  ...
 ],
 ...
  "containerEnv": {
  ...
  // For Wayland
  // "WAYLAND_DISPLAY": "${localEnv:WAYLAND_DISPLAY}",
  // "XDG_RUNTIME_DIR": "${localEnv:XDG_RUNTIME_DIR}",
  // "QT_QPA_PLATFORM": "wayland", // Force Wayland
  ...
},This is likely because the DISPLAY environment variable is not getting set properly.
-
Find out what your DISPLAY variable should be
In your WSL2 Ubuntu instance
echo $DISPLAY
-
Copy that value into the
.devcontainer/devcontainer.jsonfile"containerEnv": { "DISPLAY": ":0", }
If you want to access the vGPU through WSL2, you'll need to add additional components to the .devcontainer/devcontainer.json file in accordance to these directions
 "runArgs": [
  "--network=host",
  "--cap-add=SYS_PTRACE",
  "--security-opt=seccomp:unconfined",
  "--security-opt=apparmor:unconfined",
  "--volume=/tmp/.X11-unix:/tmp/.X11-unix",
  "--volume=/mnt/wslg:/mnt/wslg",
  "--volume=/usr/lib/wsl:/usr/lib/wsl",
  "--device=/dev/dxg",
  "--gpus=all"
 ],
 "containerEnv": {
  "DISPLAY": "${localEnv:DISPLAY}", // Needed for GUI try ":0" for windows
  "WAYLAND_DISPLAY": "${localEnv:WAYLAND_DISPLAY}",
  "XDG_RUNTIME_DIR": "${localEnv:XDG_RUNTIME_DIR}",
  "PULSE_SERVER": "${localEnv:PULSE_SERVER}",
  "LD_LIBRARY_PATH": "/usr/lib/wsl/lib",
  "LIBGL_ALWAYS_SOFTWARE": "1" // Needed for software rendering of opengl
},This is likely because vscode doesn't necessarily know about other repositories unless you've added them directly.
File->Add Folder To Workspace

Or you've added them as a git submodule.

To add all of the repos in your *.repos file, run the script
python3 .devcontainer/repos_to_submodules.pyor run the task titled add submodules from .repos
The dockerfile can be built but using devcontainer.json results in error messages like "docker container cannot connect to device [[gpu]]" means docker itself is installed, but not the above mentioned nvidia part.
Solution is, to follow the guide and the test with nvidia-smi as indicated here:
Error messages that show lacking GPU acceleration (in docker terminal)
sudo apt-get update && sudo apt-get install -y -qq glmark2 && glmark2results in:
   libGL error: No matching fbConfigs or visuals found
   libGL error: failed to load driver: swrast
      X Error of failed request:  GLXBadContext
   Major opcode of failed request:  151 (GLX)
   Minor opcode of failed request:  6 (X_GLXIsDirect)
   Serial number of failed request:  48
   Current serial number in output stream:  47
Solution is, to follow the guide and the test with nvidia-smi as indicated here: docker-nvidia(for GPU acceleration on Nvidia GPU hosts)
https://wiki.ros.org/docker/Tutorials/GUI https://medium.com/@benjamin.botto/opengl-and-cuda-applications-in-docker-af0eece000f1 https://docs.nvidia.com/datacenter/cloud-native/container-toolkit/install-guide.html#docker